The Top Bar consists of several options. We will discuss each option below according to the numbering presented in the figure:
The “breadcrumbs” option will help you to return to a page or change the workspace. Let’s check out the capabilities of this option according to the numbering below:
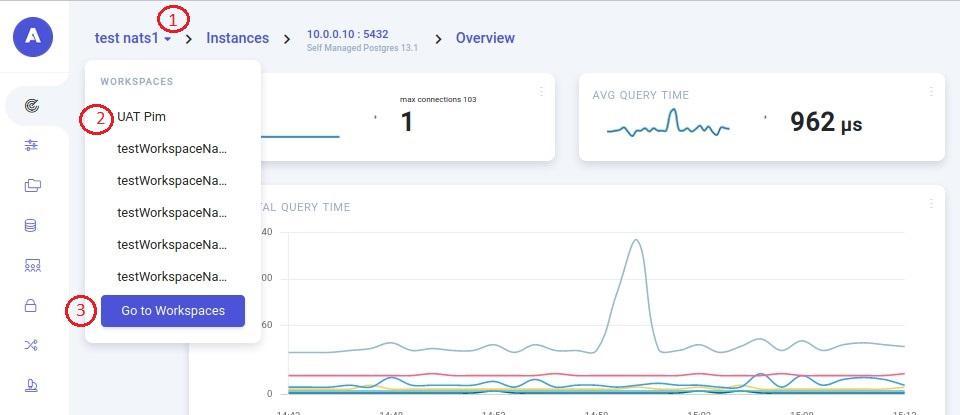
- Click on the Workspace name (indicated by the number 1 in the figure above). This will open a combobox with the ability to jump to another workspace (indicated by the number 2 in the figure above) or go to Workspaces page by pressing the appropriate button (indicated by the number 3 in the figure above).
- The rest of the elements in the breadcrumbs act as regular breadcrumbs in any website. You can press on any of them to get to a certain page.

- The “search” service will filter the elements on the current page. In this example, the search service will filter the workspaces by name (indicated by the number 1 in the figure above).
- The “TRIAL” button opens the service subscription window. Available only during the trial period.
- Clicking the “chip” symbol opens a window about on which instance have changed the number of CPUs. Available if there was a change in the number of CPUs.
- The “coq” symbol (indicated by the number 4 in the picture above), available only to users with the owner role, opens a menu with the following options:

- Users – opens a user management page for managing access to AWIDE
- Integrations – opens a page for management of alerting channels: e-mail, Telegram, and Slack
The “bell” symbol opens a menu with the following options (indicated by the number 5 in the figure two images above):
- ALERTS
- A list of alerts; when you click an alert, a page with a specific alert opens.
- The “View all” button; when you click this button, the alerts page will open.

- EVENTS LOG
- A list of events; when you click an event, a page with a specific event opens.
- The “View all” button; when you click this button, the events log page will open.

The blue square with initial letters (indicated by the number 6 in the figure three images above) opens the user menu with the following options:

- Clicking “User account” navigates to the account of the authorized user
- Clicking the “Subscription Management” goes to the subscription management page. Available after choosing a package.
- Clicking the “Support” option opens a window support request.
- Clicking the “Users guide“ takes you to a knowledge base.
- Clicking the “Terms and Conditions” option opens a window with the “Terms and Conditions” and “Privacy Policy Agreement”
- Clicking the “Logout” button will logout from AWIDE

On the dashboard page, there is the clock symbol (indicated by the number 1 in the figure above) that sets the timeframe for the graphs here.

The following timeframes are available: last 30 minutes (default), last hour, last 3 hours, last 8 hours, last 12 hours, last day and last week.
Leave a Reply